Using Microsoft SharePoint Workspace 2010, you can work with SharePoint
2010 sites, libraries, and lists on your desktop computer or laptop,
whether in or out of the office. Synchronization of changes between your
computer and the SharePoint server are handled in a smooth and
efficient manner. Using SharePoint Workspace 2010 can help save you time
and help manage your collaboration efforts much more effectively.
Introduction to synchronizing SharePoint 2010 content with SharePoint Workspace 2010
Using Microsoft SharePoint Workspace 2010, you can work with
SharePoint 2010 sites, libraries, and lists on your desktop computer or
laptop, whether in or out of the office. Synchronization of changes
between your computer and the SharePoint server are handled in a smooth
and efficient manner. Using SharePoint Workspace 2010 can help save you
time and help manage your collaboration efforts much more effectively.
When you are connected, synchronization can occur automatically
behind the scenes, although you can make the changes manual if you want.
When you are not connected —at home, on the road, or in the air — you
can continue to work on your computer. When you come back online,
SharePoint Workspace 2010 synchronizes changes you and others made while
you were offline.
For example, you can edit documents, presentations, files, and lists
(both native and external) on your computer while offline on a business
flight. You can do this by using your standard Office products and
features, such as Office Word 2010, Office Excel 2010, and Office
InfoPath 2010. When you come back online to your SharePoint 2010 sites,
all the changes can be synchronized automatically, and any conflicts
resolved smoothly.
To synchronize a SharePoint site, library, or list, you must have
SharePoint Workspace 2010 installed on your client computer and you must
have Contribute permission to the site, library, or list.
What is Synchronization?
In short, synchronization means that any changes made on your
computer or the SharePoint server are continually reconciled so that the
content is the same on both computers. This synchronization is two-way
or bi-directional. Changes made on your computer are uploaded to the
server, and changes made on the server are downloaded to your computer.
SharePoint Workspace 2010 synchronization is also efficient; only the
changes to a file or list are synchronized, not the entire file or list.
Working with documents in SharePoint libraries
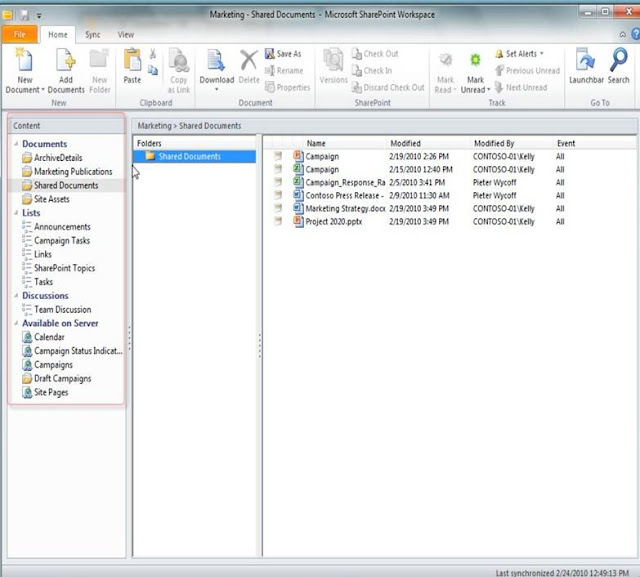
You can work with files in SharePoint libraries on your computer by
using SharePoint Workspace 2010. The library view in SharePoint
Workspace 2010 is very similar to the view in SharePoint 2010. Custom
columns, views, and content types are supported. This includes library
views, both public and private.
Custom properties, such as title, priority, and keyword, show up in
Word, Excel, and PowerPoint Document Information Panels. Even the
New command with any defined content types works in a similar manner.
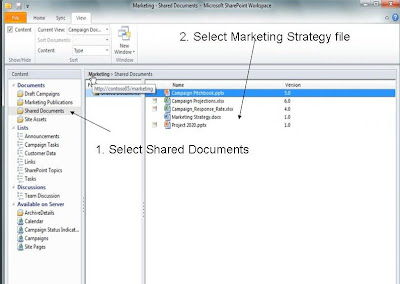
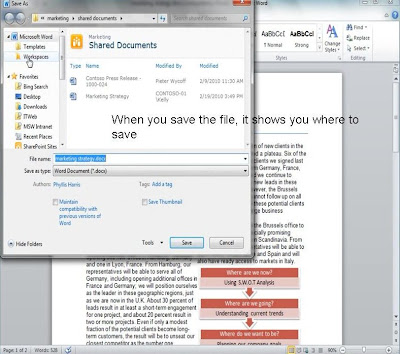
You can also open and save Office files, such as documents,
spreadsheets, and presentations, from and to your local workspaces by
using the familiar Office
Open and
Save dialog boxes. You can even drag and drop files from Windows Explorer to your SharePoint workspace.
Checking in, checking out, and creating major and minor versions is
also supported. Related commands are enabled on the SharePoint Workspace
ribbon when you are online, but unavailable when you are working
offline.
Note that an Office file, such as a Word document or PowerPoint
presentation, is treated by SharePoint Workspace 2010 the same way that
it would treat a file opened directly from the browser, and even
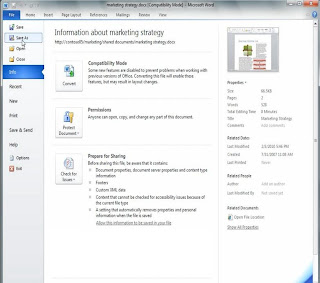
maintains the URL, which you can view and copy in Backstage view.
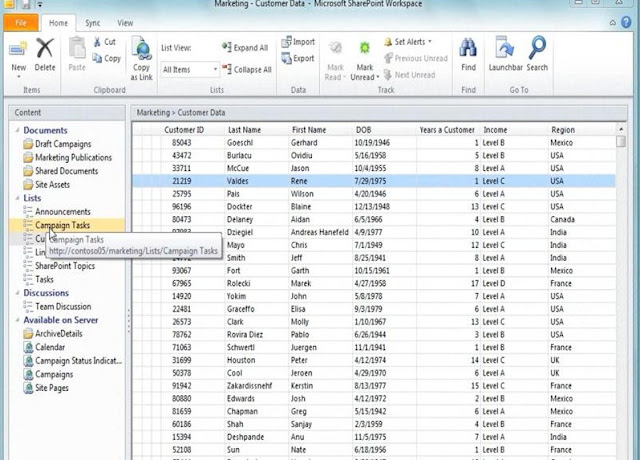
Working with list data
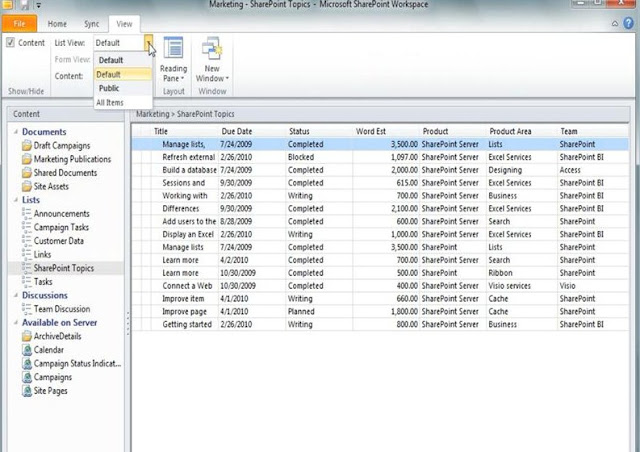
You can work with SharePoint lists, both native and external, on your
computer by using SharePoint Workspace 2010. Most types of columns,
metadata, and content types are also supported in SharePoint Workspace
2010. This includes list views, both public and private.
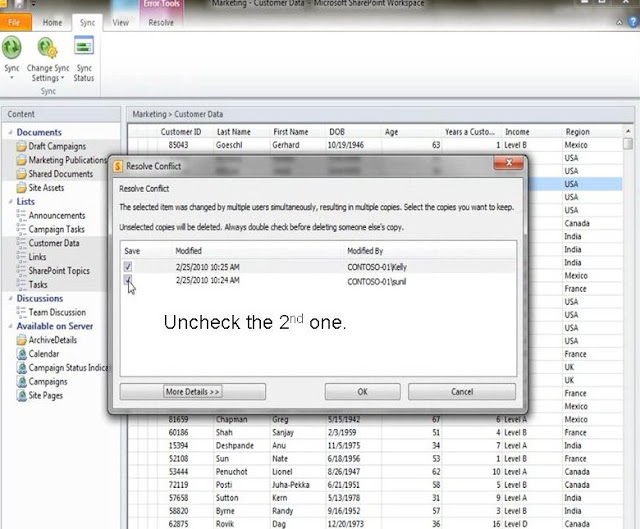
If an occasional conflict occurs when two or more people edit the
same list item, then you can use the conflict resolution dialog box to
resolve the conflict and be on your way. Even when list metadata changes
on the server, the new list metadata can be synchronized on your
computer. For example if a calculated column is added on SharePoint
2010, then SharePoint Workspace 2010 picks up the change the next time
synchronization occurs.
External lists, created by using Business Connectivity Services (BCS)
in SharePoint Designer 2010 are also supported. External lists can
contain read/write access to Line-of-Business data from data sources,
such as SQL Server or SAP. This means that you can work with your
external list data from within SharePoint Workspace 2010, whether online
or offline, and smoothly synchronize your changes directly to the
external data source.
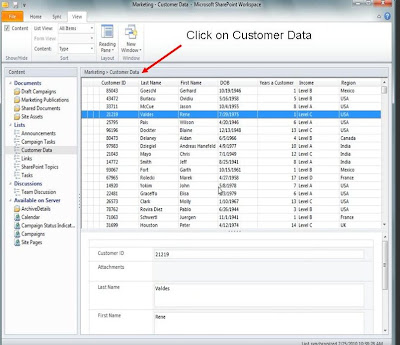
You’ll find it easier and faster to add and edit list item data and
metadata on your computer in a SharePoint Workspace 2010 than in a
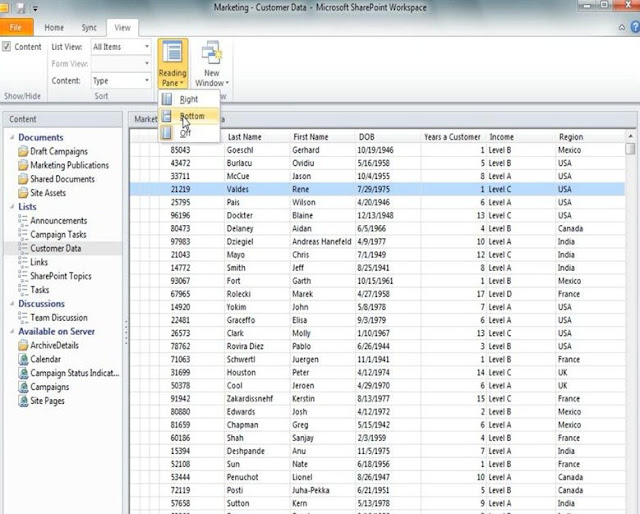
browser on a SharePoint site. You can view the list data in a grid-like
view, and edit the data in a form. The split form feature gives you a
unique and practical view into your data.
If an InfoPath form designer has associated an InfoPath 2010 form
with the list, you can synchronize that form and use it in your
SharePoint Workspace 2010. This means you can take advantage of
InfoPath’s form features such as spell checking, file attachments, rich
text, field validation, and business rules.
Searching SharePoint Workspace 2010 content
Searching SharePoint Workspace 2010 content works in a smart and robust way:
- When you search in a workspace or from the Launchbar, you can find content across all your site workspaces.
- When you search from the Microsoft Windows 7 Start button, you
search across your desktop and all your downloaded content from
SharePoint Workspace 2010. Workspaces are automatically indexed. Local
search is fast and works whether you are offline or online.
Limits, exceptions, and workarounds
There are certain limits and exceptions when working with SharePoint
2010 content with SharePoint Workspace 2010. Note that the navigation
pane of the SharePoint Workspace 2010 displays links to unsupported
lists and libraries, which you can conveniently click to work with in
SharePoint 2010 for full support if you are online.
Be aware of the following limits and exceptions when working in SharePoint Workspace 2010:
- The total number of files you can store across all your SharePoint workspaces is approximately 10,000.
Note If you have not
updated to Microsoft Office 2010 Service Pack 1, you can only store
approximately 500 documents in SharePoint Workspace before you see
warning messages about document limits. Additionally, once you exceed
1,800 documents across your SharePoint workspaces, a warning message
appears to inform you that only document properties will be downloaded
to the workspace.
- Each list can have no more than 30,000 items.
- From within SharePoint Workspace 2010, you can create, update, and
delete files in a library and new items in a list, but you cannot
create new sites, libraries, and lists.
- Sites based on an Access Web Database template are unsupported.
- The following lists are unsupported: Calendar, Wiki page, and Survey.
- The following views are unsupported: Project Task list in Gantt
view, Style, In-line Folders (which show as groups), and Item Limit.
- The people picker control is not supported.
- The editing of site pages in the site pages library is not supported.
- The editing of list attachments is not supported (Although you can open the attachment as read-only).
- The synchronization of changes made to a OneNote notebook is not supported.
- Lists or libraries protected by Information Rights Management (IRM) are not supported.
Synchronize a SharePoint workspace with a SharePoint site
- In your browser, navigate to the SharePoint site you want to synchronize.
- Click the Site Actions menu, and then click Sync to SharePoint Workspace.
- To selectively control which libraries and lists are downloaded:
- Click Configure.
- For each list or library, select it, and then in the Download box, select Headers Only (libraries only) or No Content. You can download the full content later on if you need to.
The first time you synchronize an entire site, it may take a few
minutes to download all the files on your computer, but this occurs
behind the scenes, so you can continue to work on other tasks.
Note: If the site contains subsites, these are not downloaded, but you could download those separately if you need to.
Synchronize a SharePoint workspace with a specific library or list
You can select a specific library or list, if that's all you need to
work with from a site. You might want to be selective about what you
download to save space on your personal computer or because you do not
have permission to synchronize the rest of the site.
- In your browser, navigate to the SharePoint site containing the list or library you want to synchronize.
- Click the name of the list or library on the Quick Launch, or click Site Actions, click View All Site Content, and then in the appropriate list or library section, click the name of the list or library.
Note A SharePoint
site can be significantly modified in appearance and navigation. If you
cannot locate an option, such as a command, button, or link, contact
your administrator.
- In the ribbon, on the List or Library tab, in the Connect & Export group, click Sync to SharePoint Workspace.
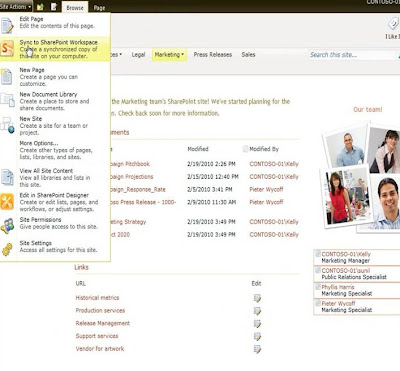 |
| Step 1 |
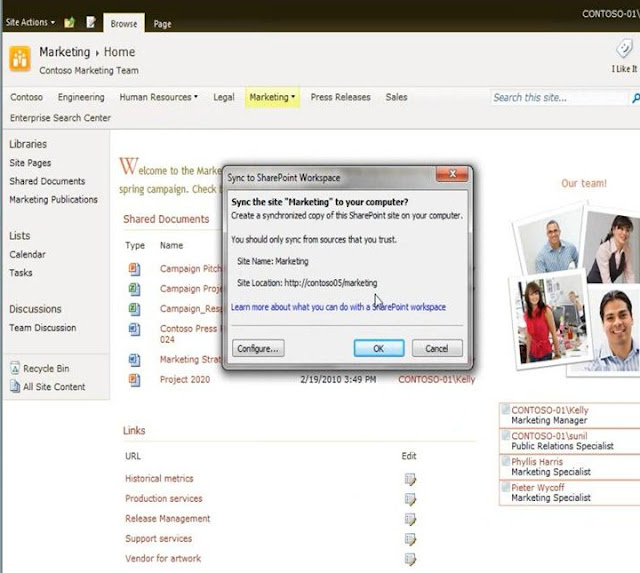 |
| Step 2 |
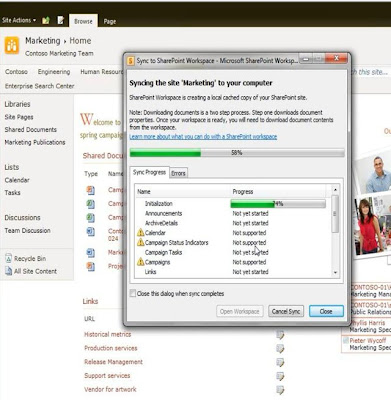 |
| Step 3 |
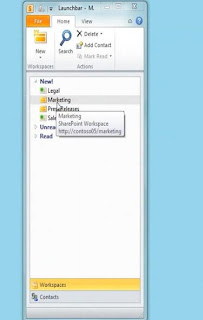 |
| Step 4 |
 |
| Step 5 |
 |
| Step 6 |
 |
| Step 7 |
 |
| Step 8 |
 |
| Step 9 |
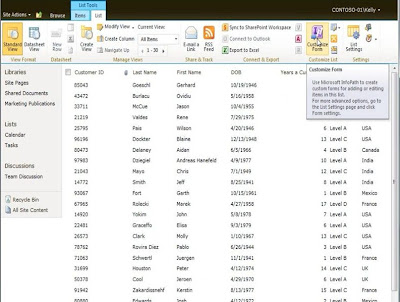 |
| Step 10: Click on Customize Items ribbon |
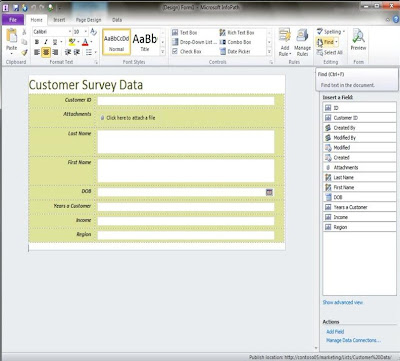 |
| Step 11: SP 2010 Workspace can be synchronized with Info Path 2010 |
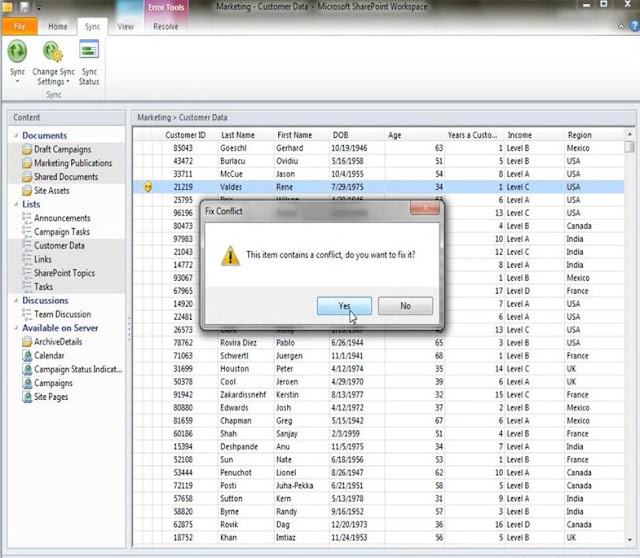 |
| Step 12: If there is a dual item, we can double check and select whatever we want |
 |
| Step 13 |
 |
| Step 14 |
 |
| Step 15 |
 |
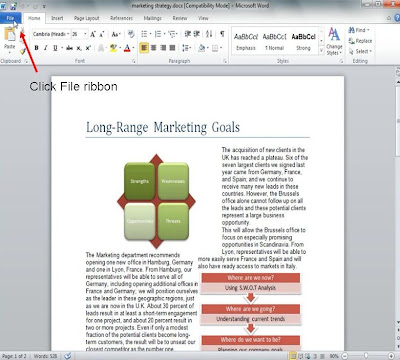
| Step 16 - Click the file on the top right of the screen |
 |
| Step 17 |


